
Flynn Buckingham
May 03, 2019

It’s been quite a while since I last created a demo application for Cosmic, and it’s been refreshing to see how much the platform has grown over the last year as it’s taken on new endeavours and has solved new business challenges in the process. One of the improvements that’s been added overtime are the substantial amount of new plugins and integrations, along with some nice hidden improvements to how Cosmic handles and manages localized content.
TL;DR:
Gatsby Localization Starter App
Before We Start
Cosmic is a CMS platform that lets you leverage your content in a way that’s agnostic to any specific platform. Essentially, it decouples you from having to lock your content down to a single framework, enabling you to implement and extend your own content as you wish. One of the most recent additions to the Cosmic toolbelt is the gatsby-source-cosmicjs plugin for GatsbyJS, allowing you to embed your Cosmic content into a statically generated React application. GatsbyJS is basically the effective way to leverage static hosting (for that sweet SEO gain), but still allowing you to leverage the abilities of a dynamic React environment.
As a means of helping people like me who are into the essentials, and then building up from that, I’ve created a minimalist Cosmic + Gatsby localisation starter application.
What is localization anyways?
Localization is the act of making your content accessible to individuals outside of the language boundary you are typically used to, or simply put, the act of making websites comprehensive for people who don’t speak the same language. Website localization is also a form of web accessibility, in the sense that by implementing it you are enabling a larger section of your preferred demographic to digest your content, which is great for everyone, including your add revenue, or just overall site traffic.
Installing the demo (from Cosmic App Section)
Cosmic provides an easy-to-use means of creating your own clone of this starter application from their own web interface. If you don’t like getting your hands too dirty, or just would like to give the starter app a test drive, you can access it from here. The prompts will guide you in creating an account and creating the necessary items.
Installing the demo (from source)
The project source can be found here on GitHub. After cloning the repository, you should have something that loosely resembles the following structure.
.gitignore
config.js
gatsby-config.js
gatsby-node.js
package.json
package-lock.json
LICENSE
src
├── components
│   ├── atoms
│   │   ├── HeaderNav.js
│   │   ├── HTMLContentArea.js
│   │   ├── LocaleSelector.js
│   │   └── PostTile.js
│   ├── layouts
│   │   ├── Blog.js
│   │   ├── common
│   │   │   ├── Container.js
│   │   │   ├── GlobalStyles.js
│   │   │   └── Head.js
│   │   └── Default.js
│   ├── modules
│   │   ├── BlogPost.js
│   │   ├── SitePage.js
│   │   ├── SitePostListing.js
│   │   └── withLocale.js
│   └── molecules
│       ├── Footer.js
│       ├── Header.js
│       └── PostList.js
└── pages
    └── index.js
Also make sure you npm install so you have the needed repositories for running the Gatsby starter application.
Configuring the base project
The project itself has two main files that are intended to be configure. gatsby-config.js is responsible for specifying which Cosmic Bucket to source your content from, while the config.js file is used for configuring various front-end portions of your application.
To ensure that Gatsby is able to read your Cosmic Bucket, you need to fill out the areas within gatsby-config.js that resemble the following:
module.exports = {
  plugins: [
    'gatsby-plugin-emotion',
    'gatsby-plugin-react-helmet',
    {
      resolve: `gatsby-source-cosmicjs`,
      options: {
        bucketSlug: 'minimal-gatsby-localisation-site',
        objectTypes: ['blog-posts', 'pages'],
        apiAccess: {
          read_key: ``,
        }
      }
    }
  ],
}
For the above, ensure that the bucketSlug values correlates with your own Cosmic Bucket, and that the apiAccess.read_key is present if you've configured your bucket to require it. Also make sure you have blog post and pages Nodes within your Bucket, otherwise the gatsby-source-cosmicjs will not have the correct Gatsby GraphQL queries (preventing you from running the demo)
Running the demo
To start the demo (in development mode) after all dependencies have been started, simply run npm start, or alternatively npm run develop. The project will then (by default) be accessible on port 8000 on localhost. The console output of the command will also let you know in case its been configured otherwise.
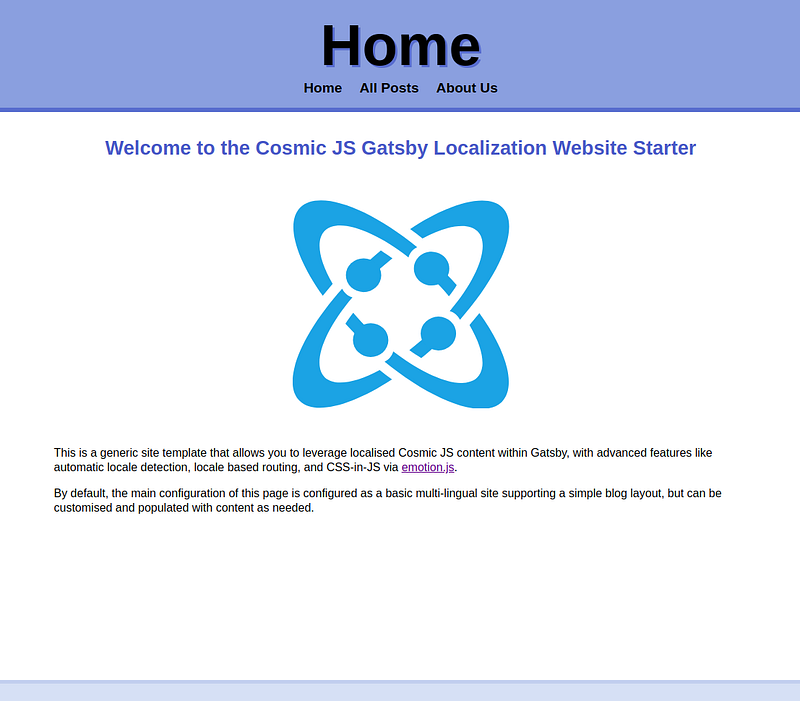
The first thing you see should resemble this:
How it works
This localization starter app in particular relies heavily on the locale value that's bound to each Cosmic Object. While each Object would normally require each item to have a unique slug constraint (meaning that slug would need to be unique among all other nodes of a given type): because we'd have localization enabled for this particular projection, we no longer need to worry about that. With localization, an Cosmic Object can have have the same slug value given that each variant also has a unique locale specified.
The withLocale component from src/components/modules/withLocale.js contains login that's responsible that a connected Gatsby page, can resolve which locale a given Page or Blog Post should be shown with, and any alternative links based on a resources available locale variations. So for example, if a blog post with a slug of example-post has locale variants in en-US and es-AR, the correct page to show will be determined by:
- The
localespecified in the GatsbypageContextvalue (if present) - The
localedetected from the url - The first available
localevalue of the resource being presented
Each of these values are compared against the value of window.navigator.languages and the value of fallbackLocale within config.js. This is helpful in situations where the content type being requested isn't actually available for a specific Page or Blog Post, or when the page has no contextually available locale, such in the case of src/pages.index, which will redirect to the most preferable locale based on browser config.
withLocale is also responsible for resolving a value called alternateResourceUrls, which is a key-value mapping of alternate locales of the currently shown page. This is used by components such as the src/components/atoms/LocaleSelector.
Project structure
The overall design structure of this application is minimal, loosely following the Atomic Design principles, in the sense that:
src/components/atomscontains components that don't solely depend on other complex child componentssrc/components/layoutscontains components responsible for grouping various components togethersrc/components/modulescontains components responsible for representing connected (dynamic values)src/components/moleculescontains components that are abstract configurations ofatoms
src/pages is responsible for storing static Gatsby pages that are usually mapped 1-1 like normal html pages. As such, files named index are treated as directory files, and files named anything represent a static path relative to the root.
Why does this starter project not have any static query pages?
As a localized starter application, the content being rendered is inherently dynamic, since it’s not capable of being mapped easily within a static application without requiring path subsets. Adding a static React page (i.e. localhost:8000/pictures-of-cats) would be the equivalent of making a default export React component in src/pages/pictures-of-cats.js.
Where are the CSS files?
Creating an styled component or usable CSS class
Emotion provides two* main ways of generating reusable styles for components.
One is via @motion/styled, which enables you to generate elements with bound className attributes.
import React from 'react';
import styled from '@emotion/styled';

// direct format
const yourCoolStyledComponent = styled.div`
  color: red;
`;

// component wrapping format
const SomeActualComponent = ({ className }) =>

;

const yourCoolAlternateStyledComponent = styled(SomeActualComponent)`
  color: blue;
`;
The second form is via the { css } helper from @emotion/core. It allows you to generate deterministic (and reusable) class names;
import React from 'react';
import { css } from '@emotion/core';

const customCssClassName = css`
  color: green;
`;

const CoolDiv = () => (


);
There are more advanced examples of what you can do from the emotion documentation here.
Managing content
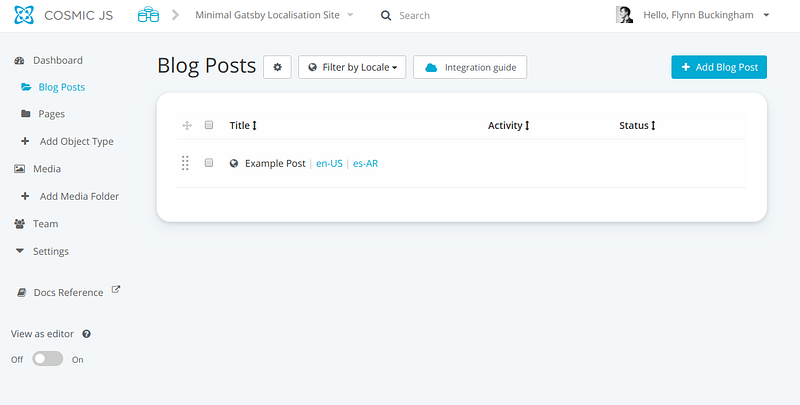
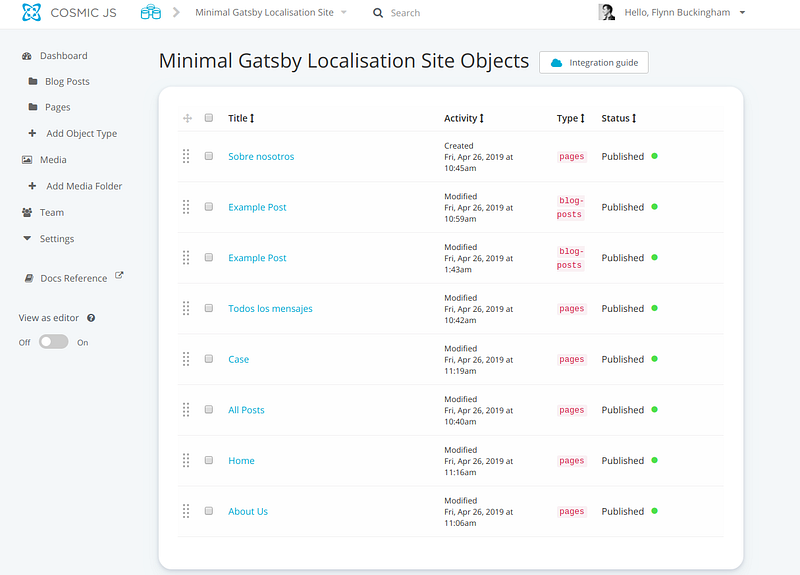
In order for this starter application to work, a few assertions must be made.
- You should already have
PagesandBlog PostsObjects configured for your bucket - Each Object needs to have localisation enabled
- Each
PageandBlog Postshould have the samelocalesavailable and should have each locale variant present.
So your environment should look something like this:
Enabling localization for Cosmic Object Types
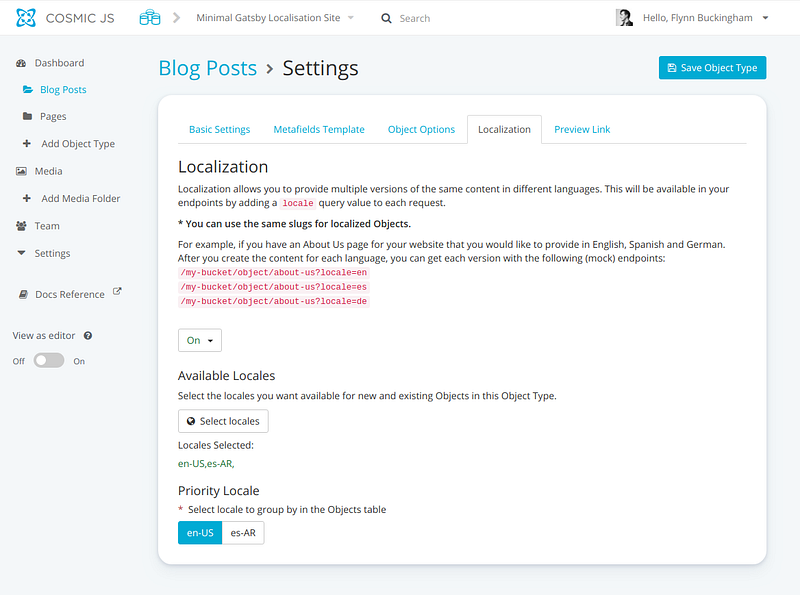
On left left hand sidebar under Dashboard after creating each respective Object Type you should have Blog Posts and Pages as small folder icons visible under the dashboard. From that same interface, you should also see a small cog near the top of the listing. Clicking that will bring up an interface to enable localization.
Toggle Localisation to On and then, add the locales you'd like to support for your application. The Select Locales button can be used to select the correct locales for the application. These should be same same for both content types.
Conclusion
If you have any comments or questions about building apps with Cosmic, reach out to us on Twitter and join the conversation on Slack.


